> ## Documentation Index
> Fetch the complete documentation index at: https://docs.innate.bot/llms.txt
> Use this file to discover all available pages before exploring further.
# Your First Agent and Skill
> Create an agent without code, then teach it a new skill in Python
You program a robot with two things:
* An **agent** is a prompt plus a list of skills. An AI model watches the camera, listens to you, and picks a skill when it fits.
* A **skill** is something the robot can do. It's a Python class.
On this page you create an agent in the web app, look at the Python it generates, write your own skill, and watch the agent use it. It takes about five minutes.
## 1. Open the robot and your editor
Start the simulator ([setup](/simulator/setup)), open the web app, and open the `innate-os` folder in your editor. The simulator runs straight from that folder, so saving a file changes the running robot.
Open the robot's [web app](/robots/apps#web-app), and open `~/innate-os` on the robot in your editor over SSH ([Develop on MARS](/software/development-setup)).
## 2. Create an agent
1. On the **Agent** page, open the agent picker at the top left and choose **Create agent**.
2. On the **Identity** tab, name it `Cheerful Agent` and enter the prompt: `You are an enthusiastic robot. Celebrate good news physically.`
3. On the **Skills** tab, click **Add skill**, pick `Wave` and `HeadEmotion`, and click **Create**.
4. Press **Start** and send *"Hi! What can you do?"* in the chat. The agent answers and picks a skill on its own.
Chatting needs an AI backend: your own Gemini key or the Innate service key. In the simulator you choose it [during setup](/simulator/setup#choose-your-agent-setup).
## 3. Look at the file it made
The form saved your agent as a normal Python file, `workspace/custom_agents/cheerful_agent.py`. Open it in your editor:
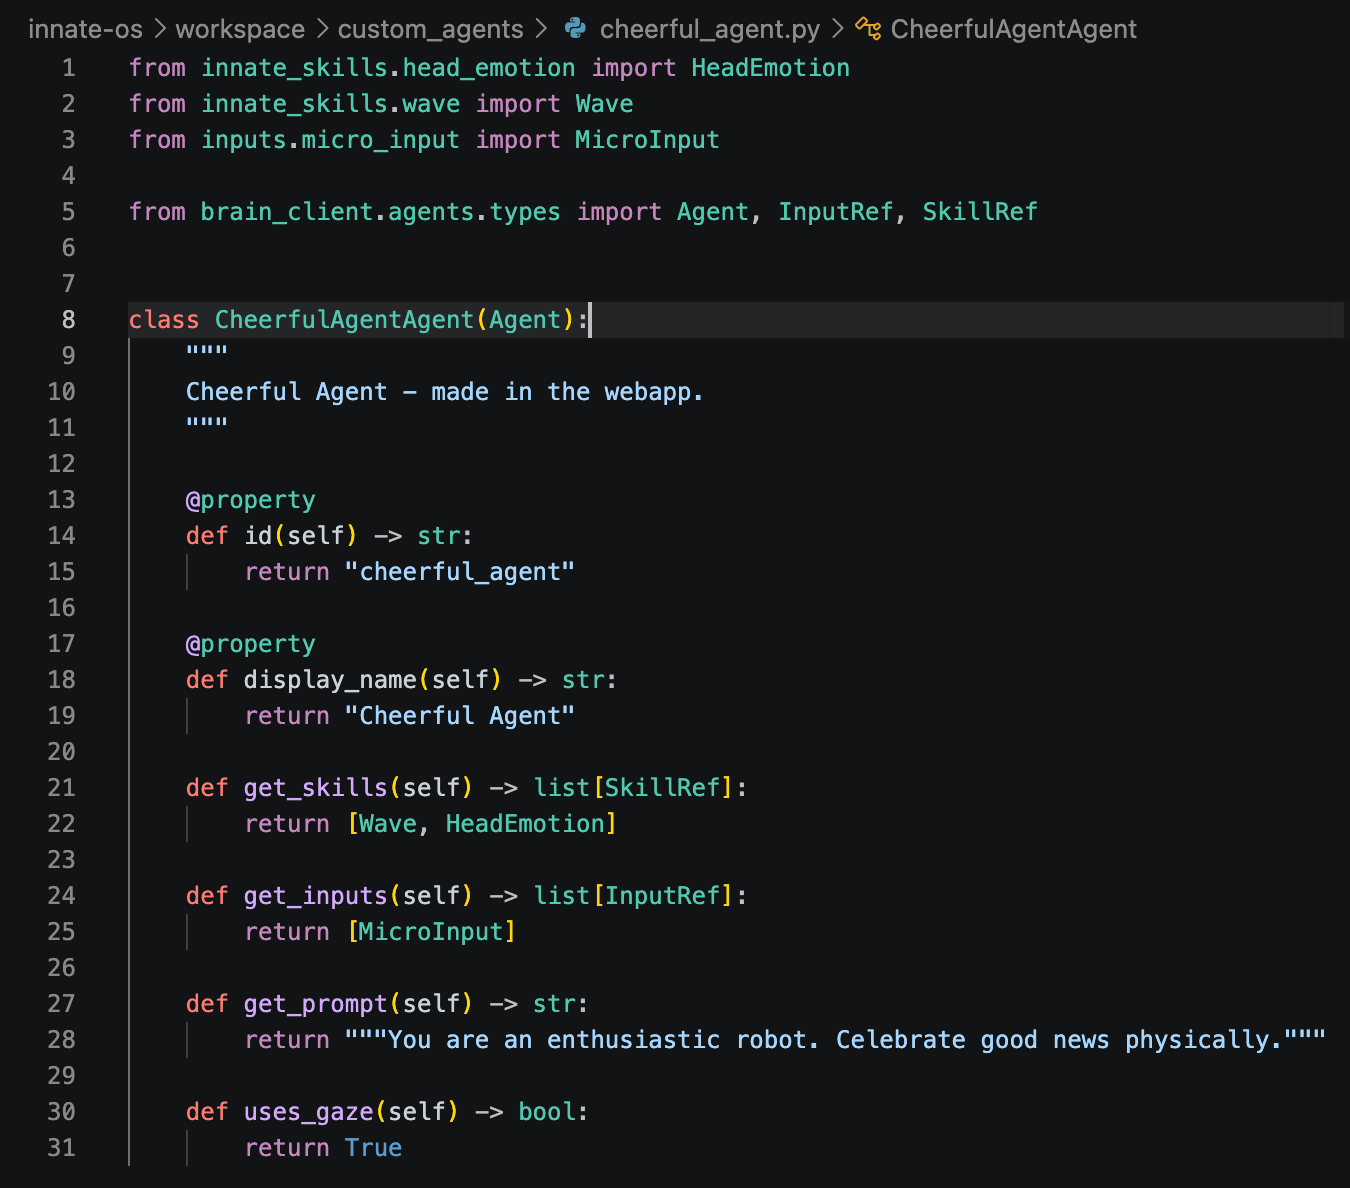 That's all an agent is: a name, a prompt in `get_prompt()`, and a list of skills in `get_skills()`. The form also turned on the microphone (`get_inputs()`) and made the robot look at the person it talks to (`uses_gaze()`). Every option is on the [Agents](/software/agents) page.
Edit the agent in the form or in this file, whichever you prefer: both stay in sync. Code can also do more than the form, like building the prompt with logic or adding methods, and you can write new agents from scratch in `workspace/custom_agents/`. The form shows those agents read-only, because it can't display the extra code.
## 4. Write your own skill
1. Create `workspace/custom_skills/victory_spin.py`:
```innatepy theme={"languages":{"custom":["/languages/python-typed.json"]}}
from innate import Mobility, Skill, SkillReturn
class VictorySpin(Skill):
mobility: Mobility # injected; guaranteed before execute() starts
def guidelines(self) -> str:
return "Use to celebrate: the robot spins in place once."
def execute(self, spins: int = 1) -> SkillReturn:
"""Spin the robot in place to celebrate.
Args:
spins: How many full turns to make (1-3).
"""
for _ in range(2 * min(int(spins), 3)):
self.mobility.rotate(3.14) # half turn, blocking; two = one spin
return "Spun with joy"
```
2. Save. That's the whole deploy: the robot loads the skill a second or two later, with no build or restart.
3. Open the skill menu in the web app and run `victory_spin`. The robot spins.
The agent reads `guidelines()` to decide when to use the skill, and the `execute()` signature and docstring to know how to call it. Edit the file, save, and run it again: that's the whole loop.
## 5. Give it to your agent
1. Select **Cheerful Agent**, open the **Skills** tab, add `VictorySpin`, and click **Save**.
2. Tell the agent *"I just merged a big PR!"*. It decides on its own that good news calls for a victory spin.
You've built a robot app: a prompt, three skills, and one of them your own code.
## When changes take effect
| You edited | What to do |
| -------------------------------- | ------------------------------------------------------------------------ |
| Skills or agents in `workspace/` | Nothing. They reload on save. |
| Settings in `config/` | Run `innate restart`. In the simulator, run it inside `./innate-sim sh`. |
| ROS code in `ros2_ws/src/` | Run `innate build`, then `innate restart`. |
## Next steps
Prompts that work, microphone input, and the built-in agents.
Use the arm and cameras, return results, and chain skills together.
That's all an agent is: a name, a prompt in `get_prompt()`, and a list of skills in `get_skills()`. The form also turned on the microphone (`get_inputs()`) and made the robot look at the person it talks to (`uses_gaze()`). Every option is on the [Agents](/software/agents) page.
Edit the agent in the form or in this file, whichever you prefer: both stay in sync. Code can also do more than the form, like building the prompt with logic or adding methods, and you can write new agents from scratch in `workspace/custom_agents/`. The form shows those agents read-only, because it can't display the extra code.
## 4. Write your own skill
1. Create `workspace/custom_skills/victory_spin.py`:
```innatepy theme={"languages":{"custom":["/languages/python-typed.json"]}}
from innate import Mobility, Skill, SkillReturn
class VictorySpin(Skill):
mobility: Mobility # injected; guaranteed before execute() starts
def guidelines(self) -> str:
return "Use to celebrate: the robot spins in place once."
def execute(self, spins: int = 1) -> SkillReturn:
"""Spin the robot in place to celebrate.
Args:
spins: How many full turns to make (1-3).
"""
for _ in range(2 * min(int(spins), 3)):
self.mobility.rotate(3.14) # half turn, blocking; two = one spin
return "Spun with joy"
```
2. Save. That's the whole deploy: the robot loads the skill a second or two later, with no build or restart.
3. Open the skill menu in the web app and run `victory_spin`. The robot spins.
The agent reads `guidelines()` to decide when to use the skill, and the `execute()` signature and docstring to know how to call it. Edit the file, save, and run it again: that's the whole loop.
## 5. Give it to your agent
1. Select **Cheerful Agent**, open the **Skills** tab, add `VictorySpin`, and click **Save**.
2. Tell the agent *"I just merged a big PR!"*. It decides on its own that good news calls for a victory spin.
You've built a robot app: a prompt, three skills, and one of them your own code.
## When changes take effect
| You edited | What to do |
| -------------------------------- | ------------------------------------------------------------------------ |
| Skills or agents in `workspace/` | Nothing. They reload on save. |
| Settings in `config/` | Run `innate restart`. In the simulator, run it inside `./innate-sim sh`. |
| ROS code in `ros2_ws/src/` | Run `innate build`, then `innate restart`. |
## Next steps
Prompts that work, microphone input, and the built-in agents.
Use the arm and cameras, return results, and chain skills together.